 VirtualCardx
How to Delete GitHub Credentials on Windows 10 & 11

Pushing code to a personal repository always returns a 403 error:
fatal: unable to access ‘https://github.com/xxx/xxx.git/’: The requested URL returned error: 403
I searched online, but everything I found was about deleting credentials on Mac or Linux — none of it works on Windows. After digging through a lot of material, I finally found the method below:
Press Win + R, type control keymgr.dll and press Enter to open Credential Manager;
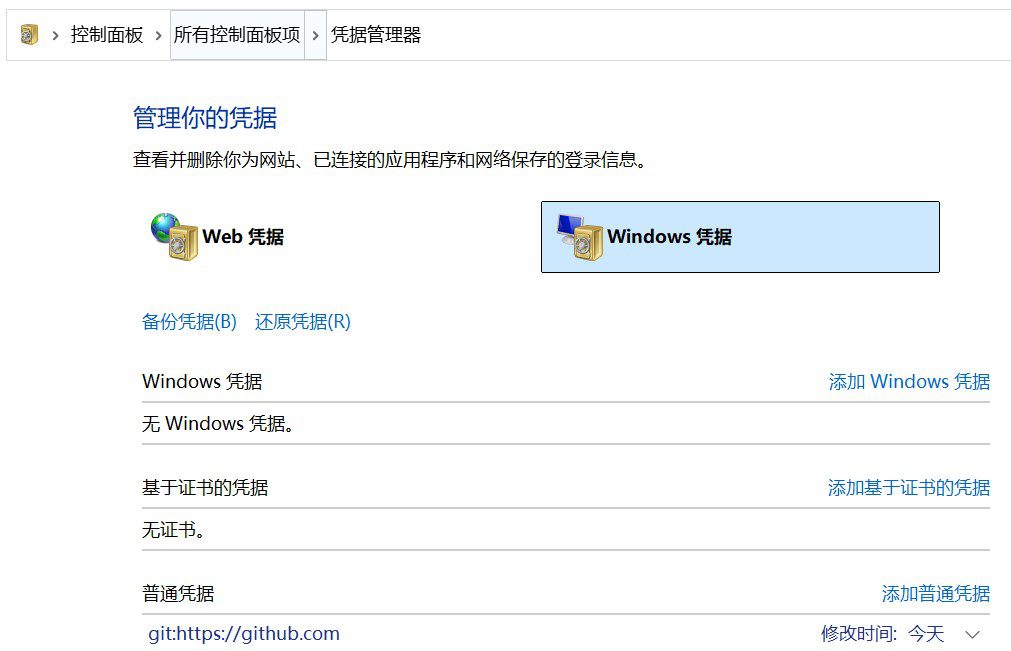
Under the “Windows Credentials” tab, find all entries containing github.com (usually the “Generic Credentials” type);
Select these entries, click “Remove” to clear the old cached credentials.
How to Delete GitHub Credentials on Windows 10 & 11: Pre-Check Checklist
Nothing is worse for tutorial-style content than copying commands while ignoring differences in your environment. Different system versions, web servers, plugin combinations and permission settings can all affect the final result. Before you start, record your current configuration and take a snapshot or backup if needed, so you can roll back quickly even if a step goes wrong.
Things to confirm before you start
- System and software versions:Confirm the versions of Windows, Debian, Nginx, Apache, WordPress or related tools.
- Permissions:When credentials, certificates or config files are involved, first confirm the current user has sufficient permissions.
- Backups:Copy the original file before modifying any config file; for WordPress sites, back up the database too.
- Testing method:Verify after each change instead of waiting until everything is done to troubleshoot.
Debugging approach
When an error occurs, first figure out which layer it happens in: browser, DNS, server, application, plugin or permissions. Breaking the problem into small pieces works better than repeatedly searching for the whole error message. For issues involving WordPress, Nginx, certificates or proxies, logs are usually more reliable than the front-end page.
If paths or menus in a tutorial don't match your environment, trust what your current system displays and locate the equivalent feature by keywords. Windows Control Panel, WordPress plugin menus and cloud console entry points in particular often move around between versions.
Ongoing maintenance tips
Fixing a problem once doesn't mean it's gone forever. Write down the key commands, the files you changed, when you changed them and the verification results. When you later migrate servers, upgrade plugins or switch themes, these notes will save you a lot of debugging time.
Related content
Review and recheck suggestions
This content should be rechecked periodically. Tool entry points, platform rules, browser menus, account risk controls and terms of service can all change. When rechecking, focus on three things: whether the original method still works, whether a simpler new solution has appeared, and whether new risk warnings need to be added.
If this is your first time, verify everything in a test account or low-risk environment before moving to production. That way, even if a step doesn't apply, your main account, main site and business data stay unaffected.
Generic troubleshooting order for technical issues
- First confirm the problem can be reproduced consistently; don't draw conclusions from a single anomaly.
- Record the current version, paths, account permissions and the full error message.
- Change only one variable, then verify immediately, so multiple changes don't get mixed together.
- If a production site is involved, back up before operating. This is especially true for WordPress, Nginx, certificate and caching issues.
Many problems that look complicated turn out to be caused by caching, permissions, paths or version differences. Layer-by-layer debugging beats blindly re-running commands.
2026 verification note
Recheck this procedure against the linked primary documentation and the live configuration before applying it. Product limits, plugin settings, dashboard labels, server paths, and commands change over time. Take a backup, test in staging where possible, validate configuration syntax before reload/restart, and verify the resulting HTTP status, canonical URL, logs, and user-visible behavior. Do not treat a successful command or a third-party tool score as proof that the underlying SEO, security, or availability issue is resolved.
Use least-privilege credentials, keep secrets out of repositories and logs, and preserve a rollback plan. For search changes, observe Search Console data over a normal reporting period rather than repeatedly requesting indexing.